Seema Kamath
Cast Party, DIY Design and Fabrication
Fall 2021
The project for this class was to take the improved clay grip from the previous project and make a mold to get 3 cast parts that were durable and usable; the 3rd of which would be sanded to the final form.

Prepping the clay grip for the mold:
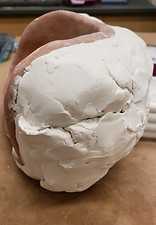
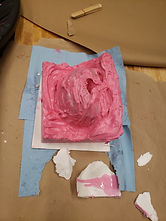
Before I could start on the mold, I needed to remove the clay from the air hockey paddle as I wanted it to be something I could simply place on top of paddles at an arcade or someone's house and I wasn't sure how an air hockey puck would bounce off the plastic resin if it were the full paddle instead of simply an add on. I also needed to fill in the gap in the bottom and made it less of an undercut. Removing the clay was much harder than expected and broke the grip part so I needed to redo it. I also smoothed out the top of the shield so that it was flatter and shorter- I made it just high enough to fully shield my hand so that at least a bit of material could be saved in the next steps.
Creating the 1st half of the mold:


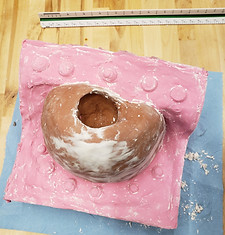
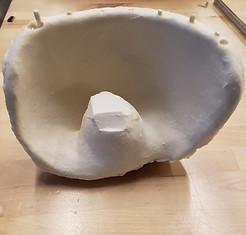
Before creating the mold, I first discussed it with the Professor and the 2 halves were drawn on the board. This included having venting holes and a large reservoir made out of clay and the funnel because of how large my part was relative to others in the class. Once this was decided, I put clay on the bottom and back of my part such that there was at least an inch on each side. I then added the straws, the clay funnel for pouring and as a large reservoir, and registration marks for helping the fit of the halves. While doing all this, I put quite a few marks in the part but they were just aesthetic so could be sanded later if I wanted to do so. Finally I cut the foam core walls and hot glued the box together adding more clay so there weren't gaps. I reinforced the lowest side with clay on the other side to help prevent any possible leakage. From here I mixed the 8 pounds of silicone part A and B together in a few containers and poured to get the first mold half which takes 24 hours to cure
Creating the 2nd half of the mold:


The first step here was removing the additional clay, of which I left some because it was smooth. From there I had to create the foam core box again and used spray release so the silicone wouldn't stick to itself. This half of the mold was a bit over 5 pounds. I also had a bit of leakage so reinforced with clay on the edges for all sides to be safe.
1st Cast:

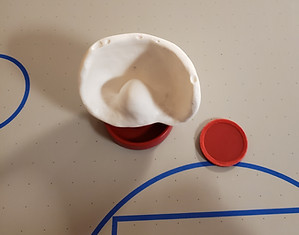
Before I poured the resin, I put spray release on both halves and then used my foam core to sandwich the 2 halves together. The top side had to get holes cut out for the pouring spout and the venting holes.I then used quite a few rubber-bands to hold them together. I was able to calculate the amount of resin I needed by taking the weight of my clay part and multiplying by 4/5 to only about 1 ounce more than I needed. Mixing together the resin was surprisingly really easy unlike the silicone which was very viscous and was quite tiring.
Setbacks:


The biggest setback for this project was that I got tendinitis in my left elbow from working with so much clay between the last project and immediately moving to this one. It started hurting the day before I started to add the white clay. I was unable to hold even my phone and hardly had a few degrees range of motion. As a word of caution, repeated gripping with the thumb, pointer, and middle finger can cause this and is what molding the clay used a ton of. Because of my left arm being useless I was using my right arm exclusively and after the first day of adding the clay to my part felt a slight twinge in my right elbow, which is what clued me into this being the main cause of my tendinitis and that I needed to take more breaks before I had both my arms useless. Even with the extension till the last day of classes, the project was still rushed as a result and I ended up getting a milder (thankfully) tendinitis in my right elbow too. It's been over a month and I can't lift stuff properly with either arm and have some gripping trouble so this should definitely be said to future classes as a reason to potentially not go up to the max allowable dimensions and more time should overall be given on these 2 projects.
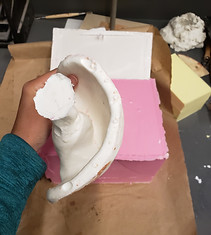
The other much more minor in comparison setbacks for this project were needing to redo the second mold half and the difficulty of removing the 1st cast part because of the undercut of the funnel shape. The older silicone part A had been in the cabinet next to the new part B, the only difference being the number. This meant that the mistake was not caught when a couple of us were using it. I had to scrape off all of the uncured silicone and then redo the mold which took quite a few hours. Getting the 1st resin pour out took over an hour, some destruction of the mold, 3 people and a crowbar. The other 2 were much easier to take out because I added clay to the mold such that there only was the tube shape..
Other 2 Casts and Comparisons:


After the 1st cast, the other 2 were much easier to remove and didn't have much clay stuck to the back. I also used the off-white instead of bright-white resin for one, but likes the bright better. For the final cast, I cut the reservoir off with an oscillating saw and then sanded a ton to get the grip back. I also sanded down the extra resin from where in the venting holes broke off and any sharp edges. I only went up to pretty fine grit where it would be gripped as the other parts wouldn't be touched much and are meant to get a bit banged up in use. I can speak from hammering this that I know this will protect my hand from any flying air hockey pucks.
Final Product:


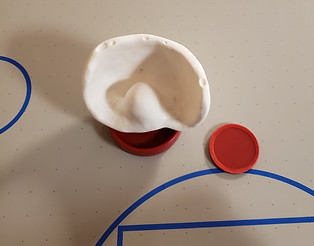
Just as I wanted it to, this project is able to easily slide onto air hockey paddles besides the one I bought for making it. The pictures and videos at an air hockey table are at CMU's game room area. I was also really happy that I could pick it up without the paddle falling as shown in the second video. Sadly, the air barely works on this table and doesn't move the puck so I haven't put this to real use just yet.